Category Archives: Ask The Experts

How to fill in an archery scoresheet

So, this is a kind of “Ask the experts” as we got a great question from a relatively new club member asking about scoresheets. It’s something that causes a lot of confusion for new members so we thought it’d be helpful to write a bit of a Master Class on what it’s all about. We’ll put up some info about handicaps in our next post.
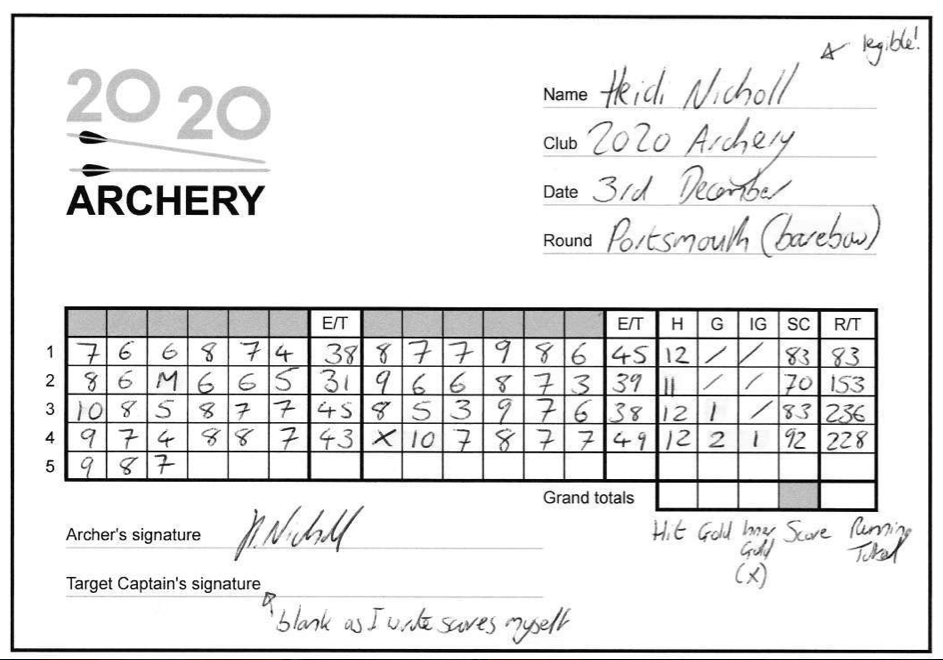
Heidi scoresheet

So, at 2020 Archery Roger is responsible for collecting in our scoresheets, collating them into ‘leader boards’ (here : https://www.2020archery.co.uk/club/archery-competition-info) and working out handicaps. Just ask one of the instructors or an experienced club member (Tim said I’m not allowed to call them Old Timers any more as it makes him feel old) where to find scoresheets, pens and clipboards if you’re not sure. They’ll also know where you should file the completed ones when you’re done.
Heidi scoresheet

To fill in the sheet you have two choices – you can do it yourself (in which case you won’t have a Target Captain) or you can ‘cross-score’ which is better and more like competitive archery. If you cross score you sign each other’s score sheet (or if you’re scoring as 4 people on a target one of you could sign them all as target captain) this means someone is verifying that it was done correctly with no cheating. When cross-scoring you should call the numbers from high to low i.e. 9,9,6. Never say “two nines” as invariably your scorer will write “2, 9” and then have to cross out the 2! This should be read out as “nine, nine, six”. Incidentally you must never touch your arrows when scoring in a competition. I know it’d be super difficult to manhandle it into a different zone but.. still.. it isn’t allowed. Try not to do it. We will accept scoresheets that have been filled in by the archer but its good to indicate this by not filling in the target captain. It also means there’s more chance of Roger double checking the scores (your target captain should do this if you’ve cross scored).


The scoresheet gets filled in horizontally with each dozen recorded and the E/T (end total) being the total for the first 6 arrows of the dozen and then the total for the second 6 arrows of the dozen. This is mainly because we shoot in ends of 6 arrows outdoors (further to walk to collect them). Now for the most frequent question that we get asked : what does the H G IG Sc and RT mean? Well, once you know its pretty simple with only one curveball. H = Hits (how many scoring arrows you achieved in the dozen), G = Gold (how many 10s and Xs you achieved). Yep, that’s right – 10s and Xs. A 9 doesn’t count as a gold on an archery scoresheet. No, I don’t know why. It’s just what I was told when I was a novice and I believed them. Any updates / suggestions about this please post in comments! IG = inner gold (very obvious – how many X’s), SC = score (total for the dozen) and RT = running total (all those dozen scores added together as you go).


So, this is an edit a week after the original post.. I asked for comments and boy did I get them! Sadly none of them would write their names in the comments box below *sigh*… the upshot seems to be that the X is not allowable for GNAS scoring but the situation on FITA rounds is a bit less clear.. this is slightly another topic (rounds and competitions) but basically the usual round we shoot at 2020 is a Portsmouth and this is a GNAS (Grand National Archery Society i.e. traditional British shooting) round. An example of a FITA round would be a FITA 18 which is very similar to the Portsmouth but shot at 18m on a smaller target face. So, apparently we shouldn’t be recording X’s on Portsmouths even though the target faces we use allow you to see how many you’ve got. The FITA target faces don’t have an X ring which means its impossible to record them.. apparently FITA rounds no longer count X’s for tie-breaks either, they look at number of 10s and then number of 9s. However, it can be a nice way to track your increasing accuracy so our scoring master (Roger – new title, great no?) is happy to accept scoresheets for Portsmouths where you have recorded the Xs.


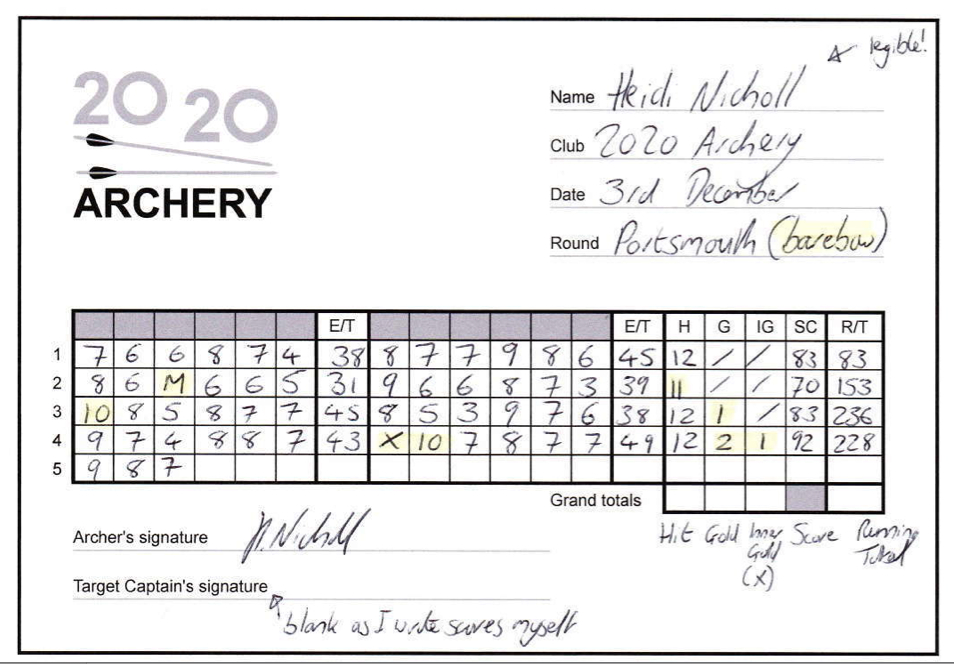
I’ve filled in a fakey scoresheet with some of the salient bits highlighted. Please indicate if you’re shooting barebow, compound (lightweight obviously at our club), flatbow, longbow or any other permutation. We will assume your score is regular freestyle (sighted) recurve unless otherwise indicated. PLEASE write your name legibly. Roger’s eyesight isn’t getting any better despite all the archery practice and he needs all the help he can get. If you are on the leader board as e.g. Heidi Nickell instead of Nicholl drop us an email and we’ll yell at Roger. Or possibly scan and upload your dreadful writing for the rest of the club to laugh at (we won’t I promise – I win all the worst writing in the club competitions by a giant margin). Dates and club should be filled in for the sake of completeness. Theoretically you’re welcome to submit scores from elsewhere if you’ve pulled a blinder while visiting another club.


Do keep handing in scores – it keeps Roger out of trouble. Your handicap (and leaderboard position) will only change when a higher score is submitted but its good practice to keep scoring and measuring your progress (although its also good not to get obsessed and occasionally have a ‘fun’ unpressured practice shoot). Do feel free to ask questions in the comments section and do keep sending in “Ask the Experts” as they occur to you.
Heidi scoresheet

Heidi scoresheet

Ask the Experts : What’s the Difference Between a ‘Recurve’ Bow and a ‘Traditional’ Bow?

So, we’ve decided to move our occasional “Ask the Expert” series away from facebook and onto our blog. Mainly because our experts (our instructors) are chronically unable to write a short answer when asked anything about archery. Be warned if you’re at the club and you start a query with, “Quick question…” it might be a quick question but it’s usually a lengthy answer!


So, this “Ask the Experts” is from Roger (well done Roger!) and gives an account of the differences between Recurve Bows (as used in the modern Olympics), Longbows (think Agincourt, Robin Hood etc), Horsebows (the short ones with leather webbing around them that you sometimes see in the club) and finally a little bit on crossbows. Please do add any other “Ask the Experts” questions in the comments below – we love talking bows and arrows!


Over to Roger :


“The difference between a modern recurve bow, a long bow and a horse bow is fundamentally one of curves and materials.


When unstrung an English (or Welsh or Scottish) long bow was – and is – a straight stave (wooden pole) with a D shaped cross section where the flat part faces away from the archer. They are typically 3” longer than the archer is tall.  When strung, the bow takes a regular uniform curve towards the archer. They were traditionally made either from using several layers of different woods laminated together, or from a single stave of wood (self-bows). Laminated bows are made using woods that favour compression on the belly of the bow (the side that faces the archer), and woods that stretch well on the back of the bow (the side that faces the target). Self-bows tend to be slower and weaker although self bows made of yew or osage orange can be stronger as it is possible to find differing qualities of compression and tensional strength in a single stave, providing the same benefits as a laminated bow. The advantage of the long bow design is that it can be made very strong and can be tensioned to very high draw weights. In some cases these bows can reach over 180lb in draw weight (usually known as war-bows) – this allowed bowyers to manufacture bows that were capable of shooting an arrow through medieval plate armour at ranges as far as fifty yards or more.


The modern recurve bow is so called because the limb-tips of the bow ‘re-curve’ back away Recurve Bow in Clubfrom the archer after the usual longbow curve. They usually have a static (unbending) riser and curved limbs. They also have a window cut into the bow to allow the arrow to take a straighter path through the bow. The window helps with accuracy as it allows the use of a stiffer arrow that can fly straighter than those released from a traditional bow where the arrow must bend itself back around the bow as its released in order to reach the target. The rationale behind the limbs “re-curving” away from the archer at the tips is so that the very ends of the limbs can be accelerated faster than the rest of the limb – this results in energy being transferred more efficiently. Ultimately this results in faster arrow speeds and improved accuracy on the target. Modern recurve bows are now typically fitted with various accessories such as artificial sights, stabilisers and vibration dampers to provide a more consistent shot.


The horse bow or reflex bow is the original recurve bow. They were common in Eastern European countries, the Middle East and throughout Asia and parts of Africa in pre-gunpowder days. They are characterised by their short length and exceptionally recurved limbs. When unstrung a traditional horse bow will curve away from the archer forming a complete C shape, but in some instances are so flexible that the limb tips almost touch forming an O shape. Their short profile made them highly successful as hunting bows (as they’re more manouverable than longer bows). They were originally made of wood laminated with horn and animal sinew although today they may be made with synthetic materials which make the bow cheaper to make and easier to use.


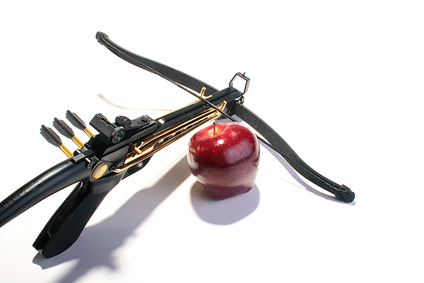
Finally, while we’re thinking about traditional bows, a crossbow can be loosely described as a Crossbowshort bow that is allowed to lie horizontally on a stock from which position it can have an arrow loaded and released using a trigger mechanism in a similar configuration to a rifle. The main advantage of a crossbow as a weapon is that once the string is drawn back it can be locked into place until the trigger is pulled. This allows the weapon to be loaded without being pointed at the target and without requiring any extra energy to be held at full draw for extended periods of time. Crossbows typically have much higher draw weights as the hold is done mechanically. Drawing or ‘cocking’ the bow can also be achieved with mechanical assistance by using a cocking aid. This means that bows over 100lb may be loaded with the aid of a winch by a single person. Cross bow limb design covers most types of bow shape and materials ranging from un-recurved basic wood through reflexed horn and sinew, to space-age material and radical modern design.”

As well as Target Archery there are many other disciplines that use both / all types of bows. You can get involved in everything from clout shooting, Archery Tag, field archery, bowfishing and the curiously named ‘Popinjay’ shoots… but what they all are will be for another post…!

As always, comments and questions are welcomed and suggestions for other “Ask the Experts” are especially useful!

Dan – Traditional Bows : a Beginner’s Guide to Wooden Longbows

I got my first traditional bow last year and I was happily hooked soon thereafter. Even if I am wielding something that is more usually found in the gloomier regions of the Amazon Rainforest in an indoor hall near London Bridge it’s still rather a lot of fun! I soon decided to look into buying something better. What followed were many weeks trawling through the internet looking at random bits of tree and talking to some spectacular beards, and as such I thought it might be worth passing on some useful little tips which I picked up. 

Modern traditional bows are an oxymoron as they are normally made up of 2 or 3 layers of wood called laminates. This is because different parts of the bow require different technical properties, specifically the ability to withstand compression or tension, and it’s impossible for one type of wood to do both equally well. Laminate bows therefore utilise woods with different types of properties in different parts of the bow which makes them better but more expensive than single piece self-bows.

Your bowyer will be able to give you detailed expert advice on the best types of wood to use and different bowyers prefer different types of wood. The following however is a good starter for 10, regardless of whether you go for an off-the-shelf bow or a more tailored one.

Bellywood. The belly of the bow is the part of the bow which is closest to the archer, and requires a wood which is capable of withstanding compression. The most common bellywood is Lemonwood which is cheap to use and found in most traditional bows. It won’t last more than a couple of years though before it starts to have a bend in it called string-follow, but it is excellent for a first traditional bow. [NB according to many bowyers, string-follow actually improves the performance of a bow, so like wine your bow will improve with age!]

Other bellywoods include Ipe, Yew, Osage Orange and Putu Jumau. Each of these is excellent under compression making them ideal for the belly of a bow, if in doubt, go for the one whose colour you like best – a traditional bow can, and indeed should, be something beautiful.

Corewood. The core or middle of the bow is the foundation of the bow and is typically made of a very hard wood, indeed the harder the better. The most common are Purpleheart or Greenheart which are excellent corewoods and, because of their availability, they are cheap.

Other corewoods include Balau [“harder than the knockers of hell” as one chap colourfully described it], Ipe, Yew, Padauk, Bubinga, Snakewood and a whole host of other woods I have never heard of – as with bellywood if in doubt go with the one whose colour you like best. 

You will note that Yew and Ipe, and indeed several others, can be used as both core and belly woods, in such a case you would end up with a bi- as opposed to a tri-laminate bow. 

Backwood. The back of the bow is the part of the bow furthest from the archer and requires a wood which is capable of withstanding tension. By far the best backwood is Bamboo, which unfortunately is also the most expensive. If you are buying a tailored bow, it is worth sacrificing cost elsewhere in the bow to be able to have a Bamboo back. Hickory or Maple are also perfectly good choices for heavy (60lb’s or more) and lighter bows respectively.

Traditional bows come in a whole host of different types, shapes and sizes from delicate flat bows to 140lb warbows, each of which however will incorporate the ideas discussed above. Go on give it a go, you won’t regret it!

How to Improve Your Archery

We get a steady trickle of requests about additional coaching to help you progress once the beginners course is finished. Often these requests come very soon after completing the beginners course and there are a few things that we’d recommend you try first. 

We do offer advanced coaching either as a 1 to 1 or if you can gather together 4 people that want a weekly group coaching session for 4x weeks we can arrange it (but we don’t put together the groups ourselves). http://www.2020archery.co.uk/club


  • Secondly, buy some books and magazines! We like Fundamentals of Recurve Archery, Steps to Success (a bit American) and The Art of Repetition by Simon Needham. The Art of Repetition is particularly good for bow tuning if you’ve just bought some kit (and has a DVD available as well). The best magazine out there is called Bow International – they have lots of features on coaching and improving your shooting.


  • Make friends! If two of you can team up you can observe each other’s performance and give very worthwhile feedback, even if you’re a novice. You might not spot everything but you can check the basics of drawing position, release and stance. Even for more experienced archers just having someone step back and look at you (even better film a few arrows of each other shooting and watch them back together) can be hugely helpful.


  • Get out and about cont’d. Aim4Sport do some great continued coaching. It costs about £30 for a 1 hr one to one or you can book 6 sessions for £150. You’ll probably be able to get some outdoor experience as well if you can get up there (Bedfordshire) and get some longer distances under your belt. http://www.aim4sport.com/archery-lessons/coaching/


  • Join Archery Interchange UK (AIUK) – it’s a web forum for archers and you can make some friends, get some advice (obviously not all advice will be useful) and perhaps join in some competitions / leagues. The more archery you do and see the better you’ll get. Sometimes you just have to launch into the wider community and get a bit immersed. Archery is all about developing muscle memory and making the commitment to practice – you’ll progress much faster by using the above resources and shooting 3 times/week, than by spending the money on 1 to 1’s every week for 6 months. http://www.archeryinterchange.com/forum


  • If you’ve done all this and you’d still like one of our instructors to work with you we can arrange 4x 1hr sessions for £250. We know this is expensive but our costs are really high compared to other clubs and this isn’t really something that we specialise in (i.e. we aren’t set up like the shops where they have people who’s time needs to be filled – we have to organise and book everything individually and people – including administrators – need realistic payment for this). You can ask for a particular instructor and as long as they aren’t working we’ll try and get you hooked up. The 4 lessons must be taken within a 6 month period and can’t be carried over. Sorry but we can’t offer discounts, ‘half a course’ or sharing with a mate etc. It’s important to us that we can really deliver something useful for you and this seems to be the best way for us to do that. We can also arrange an intermediate course if you have a group of 4 people who can agree on 4 dates to book. Intermediate courses cost £100pp.  

Remember the thing that will help your shooting most of all is to practice! Practice a lot and I PROMISE you will improve!

Best of luck and Happy Shooting!!

Josie : how to build / fletch arrows

Today I’m taking you through the first of this year’s major archery purchases: new arrows.
A lovely line of lovely shiny points
The arrow choice was made on advice – taking the jump from aluminium X7 to carbon is a significant step that can be costly. Considering the likelihood of upgrading limbs one can’t expect arrows to be well-matched to increased poundage, so it made sense not to spend a small fortune on arrows I may not use for that long. Luckily, Roger was on hand to recommend Carbon Express as an excellent alternative to Easton. I went with Medallion XR on the basis that the shafts and components came to under £140 for a dozen arrows, so not too big a deal if I need to upgrade them in six months. 
It’s the first time I’ve assembled arrows so there was a bit of a learning curve. Luckily, several experienced archers are a short hop away on email so advice was never far away.
Let’s get on with assembly. First, I cleaned the shafts and inside each end with isopropyl alcohol. Then I fitted the nock inserts. I used Dragon Spit for these, seemed like a reasonable idea. Before gluing, make sure all the shafts are the same way around or the writing will go different ways on your arrows! 
Newly fletched arrows
Next came the points. When it comes to points, there are many different fixatives recommended and it’s a little confusing. Would hot-melt be better than epoxy? Do you need to use an “archery” glue or will a bog-standard hardware glue work just as well? Can you get away with super glue or another cyanoacrylate instead? I couldn’t decide so I asked Roger – given his experience building and mending arrows it’s fairly safe to assume he knows what he’s talking about. He recommended hot-melt so I went with that.
The points themselves were quite easy to fit, but I did find a couple of snags which can be avoided. Firstly, when working with hot-melt you have only the “hot” window in which to work with the glue before it goes off. As such, putting it on to a cold tip will decrease working time significantly. I heated the tips with a heat-gun until they were quite warm but still able to be held. With my first point, I inserted it too slowly and the tip got stuck halfway, so I heated the shaft gently for a couple of seconds until the glue had softened enough to push the rest of the point in, which worked perfectly.
Now for the pin-nocks. These aren’t really any harder to assemble than G-nocks (which I have on my X7s), but the metal pin insert serves the added purpose of protecting the end of the shaft from direct hits. The nocks push onto the nock pin but are not glued: it’s a tight fit when they’re on so they don’t need to be. I like to get things just right, so I positioned the nocks so that the arrow text is perfectly aligned down the side of the arrow when the arrow is at full draw. Makes it look so much more professional… 
The trickiest part (for me) was fletching. I think I used too much glue on this first batch – getting the exact right amount eluded me. Too much is a bit messy and too little will not stick well enough. For reference, a blob of glue at each end of the vane will also help stop the vanes coming detached at the weakest part. It was the first time using my fletching jig so I had to set the alignment for the arrows I was fletching, but this was straightforward and didn’t take more than a minute or so. Fletching a dozen arrows takes time – every vane has to be glued, positioned and allowed to set for a couple of minutes before then removing the clamp and rotating to the next position. It’s very “on-off” work so good to do whilst doing something else (cooking, watching TV or even at your desk at work if you have a forgiving boss!). 
This is my first arrow build so I don’t yet know how they will shoot. I’ll add a comment when I’ve tested them! Let’s hope they don’t disintegrate on impact…
I’m sure there are some other tips which will help fletching/arrow building, would anybody like to add any?