Category Archives: How to Improve your Shooting

Why bother keeping score?

When people first join the 2020 club, I usually give them the following recommendations:

  • Don’t worry about your score.
  • Keep score every couple of months.

Let me explain.

When to start scoring

When you first walk onto the range having just finished a course, whether that’s a 5-week course or the intensive weekend version, there’s a lot to remember—and a fair bit extra to learn. Suddenly, all of those excellent gold shots you made on the last day of the course disappear and your arrows are wending their way three targets to the left because you can’t remember which way to move your sight or what the hell we were talking about when we explained string pictures.  

Which is why I say: don’t worry about your score, especially for the first few sessions. Focus on remembering your stance and set-up and sequencing—that’s the order of steps that you take from planting your feet on the line to releasing your arrow. Focus on getting 3 arrows in more or less the same place on the correct target, and then on moving that group towards the gold.

Eventually, though, your arrows should all be hitting the target relatively consistently. It’s at this point you might consider scoring.

The phrase ‘keeping score’ carries a whiff of competitiveness, but scoring isn’t about beating other people unless you’re actually in a formal competition. Keeping score is about having a numerical value that tracks your progress as an archer. As such, I thoroughly recommend you score yourself every few months. Scoring every time you shoot is frankly boring and can be off-putting because any improvements are likely to be slight, if they’re there at all.

How to score

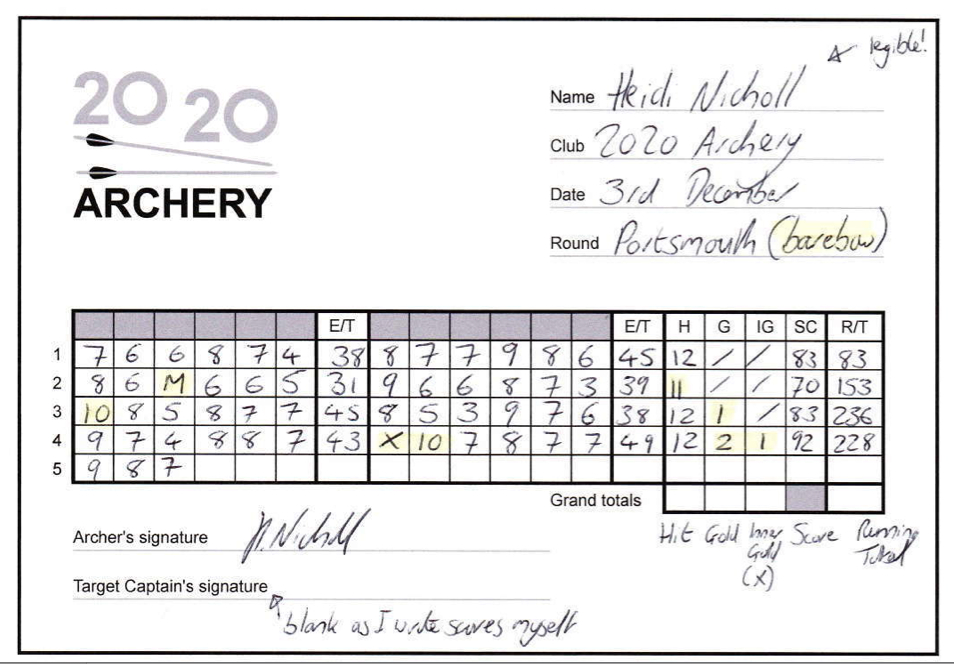
Scoring is easy. There are loads of different types of competition scoring in archery, but the 2020 club generally uses a standard GNAS Portsmouth round of 60 arrows on a 60cm target face, for a maximum possible score of 600 points. We cover how to score on our beginner courses, but as a refresher, see the following image of one of our Portsmouth scoresheets:

Each end of 3 or 6 arrows should be totalled in the ‘E/T’ (End Total) columns. End scores should be written from highest to lowest (ie, ‘10, 9, 8’ instead of ‘8, 10, 9’). The ‘H’ column tracks the number of hits on the target, the ‘G’ column counts the number of gold hits (the number of 10s), and the ‘IG’ column the number of inner golds (‘X’s). *

Scoring at the club

It is usually possible to do a full Portsmouth in a single club session, along with a couple of ends for practise. The rule is, though, is that you can’t discount any ends from your scoresheet once you’ve started: no sneakily discounting rubbish shots! You should also assign someone to be your target captain, who will make sure you’re not being too generous with arrows that aren’t quite touching the lines and who needs to check your maths at the end of the session. Just ask the nearest club member—they’re usually happy to help and they might ask you to return the favour!

If you want to submit your score to the club, you’ll need to commit to a full 60-arrow Portsmouth round at the full indoor distance and have a target captain sign your scoresheet. Your score will be listed on our internal leaderboard and we might send you a shiny badge if your score is high enough. However, if all you want to do is check your progress, you don’t need to be so strict. We have scoresheets for Half Portsmouths of 30 arrows—just enough to get a good numerical sample.

Scoring with different bows

Do remember that the type of bow and setup you use will dramatically change your scoring potential. Most people shoot either ‘Freestyle’ (recurve plus whatever attachments you like, including a sight) or Modern Recurve Barebow (recurve without a sight), but you might also want to keep score if you shoot traditional bows. Whichever style you choose, make sure you mark your scoresheet appropriately if you submit it to the club, as unmarked scoresheets are defaulted to ‘Freestyle’ on the leaderboards.

And, of course, make sure you keep score if you go and buy a new bow: the biggest jump in your personal best is very likely to be the day you stop using a club bow and buy something tailored to you.

Read this article for more information about scoresheets, competition scoring, and scoring etiquette.

* Note: A GNAS (Grand National Archery Society) Portsmouth round does not officially recognise the central circle on the target as ‘X’; it holds no more weight than the 10 ring. However, we at 2020 think that counting the number of ‘X’s you hit helps with tracking your progress as an archer, and as such we allow ‘X’s to be marked on submitted scoresheets.

What does over bowed mean in archery?

We often forget how much terminology we use in archery and how daunting it can be as a beginner so we thought we’d tackle a few of the big questions here on the blog starting with:

What does it mean when my archery instructor says that someone is ‘over bowed’?

Obviously, it doesn’t mean that they have too many bows because we all know that you can never have too many bows. This is what garages were invented for (or in London spare bedrooms, large cupboards, or any available wall or floor space). It actually means that the weight of the bow that the person is trying to pull is too much for them.

So, firstly ‘how can you tell?’ and secondly, ‘why is that a problem?’ Well, the second most important rule of archery (the first is about where you’re pointing the pointy end) is that in order to be successful an archer must be completely in control of the shot at all times. You want a smooth, repeatable shot cycle – which is exactly the same for every single shot that you take.

So, how do we know you’re over bowed? A good sign is if you see the archer wobbling around, raising their shoulders (no they shouldn’t be up around your ears and yes, it is possible for them to come down) or doing any one of a million other small, painful things (huge tension in the neck is another giveaway or grim locked-jaw with throbbing forehead veins) to try and brace yourself for the huge HOICK back… then you’re not fully in control.

Why is it a problem? Because it throws your shot off and because it’s not repeatable. If you are over bowed it will get progressively worse through the session as you tire – meaning ever more random things start to become part of your shot. We practice regularly to try to build muscle memory in a positive way – we REALLY don’t want for an archer to build in any of those painful things. So, if you feel that you’re tiring or perhaps you’re on the very edge of being over-bowed – once you start to feel that your shots are off, or you are not fully in control – then stop!

Give yourself the break and come back fresh another time.

How to increase bow poundage

It’s incredibly common in archery to struggle with the weight of your bow. It’s common for novices trying to get into the sport, it’s common for novices transitioning from beginners course to buying their own equipment and it’s common for more experienced archers who have bought their own equipment and find that – after the event – they have been a little too ambitious. It’s also a common scenario for people returning to the sport after a pause and for people returning post-injury.

First of all lets get the terminology out of the way – if you’re struggling with the poundage of your bow coaches usually call this ‘over-bowed’. There are some characteristic features of a person’s draw which will tell us if they’re over-bowed but, more often than not, it is something that the archer is aware of (although maybe in denial about)!

I’ll answer a few basic questions and then we’ll move on to how to fix it.

How heavy should your bow be?

The quick answer is: as heavy as you can manage whilst still being completely in control of it at all times. This means completely under control during all parts of the draw, aim and follow-through.

Why would you want your bow to be as heavy as possible?

The easiest way to explain this is to imagine a child shooting a very light bow over a long distance. You can imagine the trajectory as the arrow has to be aimed UP and then it leisurely floats down to land on the target.. with no weight behind it. While it IS possible to shoot somewhat accurately like that (especially indoors where there’s no wind) it intuitively makes sense that if you send the arrow out of the bow more forcefully, it will travel faster and make it to the centre of the target more accurately.

You’ll also find that you’re limited if you try to increase the distance that you’re shooting when you’re shooting a lighter bow. There are all sorts of hacks and tricks (like turning your sight inside the bow to get a sighting point at distance) that can help you.. but an 18lb bow just literally can’t propel an arrow to 70m.

So, we have two scenarios – you already HAVE a bow that’s too heavy for you or you’re shooting a lighter poundage and you want to increase the distances / accuracy of your shooting.

Firstly, the stronger you are – within reason – the better your archery will be. End of. Competitive archery requires physical strength (over the course of a competition archers will deal with more weight than weightlifters – we just do it cumulatively not in one go!) and stamina. The more you can increase both of these things the better your shooting will be.

It also figures that if you are comfortable on the shooting line handling the weight of the bow then you’ve got one less factor to possibly throw you off.

So, it makes sense that the first thing to look at is how can I get physically stronger? Now, I truly believe that there are fundamentally two types of people in this world. Those who love to go to the gym (you can replace ‘the gym’ with whatever word you choose – yoga works well in this case) and those who like to shoot stuff. So, I get that me telling you to go to the gym is probably going to be as welcome as a dose of scabies.. but.. go to the gym. If you possibly can. I promise that if you do the right things at the gym it will make your archery better. So, what is the right thing at the gym? Well what you want is a strength training programme – preferably with a trainer who knows that you’re doing this because you want to get better at archery. And, again if possible, using resistance weights as that’s the best way to mimic the push and pull action of drawing a bow.

For this one you don’t need to do anything crazily specific (like those resistance bands – we’ll get to them later) but a general strength training programme which covers biceps, upper back and core will help you immensely. You might even discover that the gym isn’t that awful. (OK it probably is – I’m an archer, what else can I tell you?).

The next thing is to pull your bow! It sounds obvious but again, as a coach, I can tell you that one of the surest things that you can do to get better at archery is to pull your bow more. And the sweetest thing.. is that you don’t even need to get to a club. And, you don’t even need to shoot arrows. I’m not talking about buying some crazy technical device that allows you to practice your release without actually shooting (although such things exist – see here and here) but just pulling your bow more will help a LOT. This is a particularly good tip for people who have over-bowed themselves. The absolute worst thing you can do is see it sitting in the corner in its bag… feeling slightly resentful toward it and slightly dreading / hoping for a miracle on Saturday – the one day of the week that you shoot… but you missed last week because Great Aunt Mary came to visit.

So, get your bow out! Yes, you can keep your bow strung at home without any harm coming to it. So, get it out! Keeping your bow strung in the spare room (or the lounge if you’re keen and you have an understanding partner) means you can get logarithmically more pulls in each week.

So, what should you actually be doing? Well, you should be mimicking everything that you do on the shooting line – except for nocking the arrow or releasing (you don’t want to dry fire). Keep the bow on its usual stand, lift the bow from its stand placing your hand correctly into the grip, take up your position with normal foot placement, raise as normal, draw as normal, smoothly connect into your reference point as normal, ‘aim’, count to 3 or 5, then relax the tension on the bowstring and come down. I would do 3 or 5 repetitions before replacing the bow on its stand.

If you’re really keen you can get a shot counter (row counters for knitting are fab for this – here are my top three: the cheapest, the cutest, and the one that I use) which in this case would be ‘draw counter’, and use it to count how many ‘shots’ you’ve practiced that day. Try and set a realistic goal – for a realistic amount of times each week.

Those are the two top tips – do these and I promise that you will get stronger and struggle less with the physical side of the sport.

Other things which I’ll just mention – yes you can get resistance training bands and some coaches (and archers) swear by them. If you’re not sure what I’m talking about here it’s this kind of thing (we’re not necessarily recommending these ones). They are convenient because you don’t have to get your kit out – if you genuinely ARE shooting four times a week I can see that getting home and putting your bow up AGAIN might be a bit of a barrier – but there are a few drawbacks too (and really? Are you shooting four times a week already?!) I don’t like the feel of them in my hand and I find it hard to mimic the pushing aspect of the draw (certainly at the end of your drawing sequence you will be releasing with 50:50 split on pushing the bow away and pulling back on the bowstring) and I therefore find it really hard to make it feel anything like a real draw. But they do have their place, they’re reasonably cheap and you can get them stronger or lighter to help you build up.

If you are overbowed the best fix is – obviously – not to stay overbowed! So, bite the bullet and buy some lighter limbs (or buy a lighter bow if you’re shooting traditional, or get the poundage lowered if you have a compound). Nothing will put you off archery faster than being overbowed – it’s painful physically AND psychologically because if you can’t fully control the bow, all the way through every shot, you just aren’t going to be shooting consistently. If you can have a second bow or second set of limbs do the drawing at home thing… or go to the gym for a bit and then try the drawing at home thing.

Take the heavy bow to the club occasionally – in conjunction with gym / drawing at home.

Only shoot it:-

1) if you are completely control of it when you are shooting and,

2) until you feel that your strength is going.

I can’t stress enough that you should not persist once bad form comes in / tired archery starts to happen. If you do this you’ll be teaching your body that raised shoulders and gritted teeth (and frustration from pinging it into the black) is how archery happens for you. But do try to do a little more each time.

Shoot more!

If I could write this in 88 point font I would! No-one ever got to the Olympics shooting once a week (and skipping a week when Great Aunt Mary is in town). If you can shoot twice a week you’ll improve twice as fast. If you shoot three times a week you’ll improve three times as fast. OK we can’t guarantee that your scores will double or triple… but you will do better than how you’d shoot if you only did it once a week. If you can shoot three or four times a week (especially if combined with extra drawing at home and caring for your equipment) you will almost certainly get to a (basic) competitive level in a few months.

Finally, work up gradually – transitioning from an 18lb beginner bow is the hardest step to gauge and will depend on your general strength and condition, and how often you practice. But, generally speaking, increasing poundage by 2 to 4lb whilst shooting regularly (twice a week) is the way to go. Once you feel fully in control of the bow you can increase by a couple or a few pounds. You can also wind your limb weight up or down by around 10% but, be aware, that this is intended for you to perfectly tune your arrows – it isn’t intended as a way to increase the poundage. If you aren’t hugely precious (at this stage anyway) about your tuning though, it can help a little to transition you up (or down in the case of post-injury recovery). Limb exchange schemes can also help with this for beginners just starting out, or those aiming for outdoor shooting – or competitions – who e.g. have a plan to get to 40lb.

So, that’s my coaching perspective on how to increase the poundage of your bow. We’re considering offering some online coaching / goal setting covering more of these ways to improve in a step by step way.

Let us know by email or in the comments if you’d be interested to know more!
Archery Anatomy by Ray Axford

Book review: Archery Anatomy by Ray Axford

Ray Axford, the author of Archery Anatomy, describes his book as a “primer of anatomical biomechanics and elementary physical mechanics as they relate to archery”. That’s a pretty accurate description: if you’re looking for tips to combat your target panic, you won’t find them in here. Archery Anatomy, as the title implies, is deeply grounded in the physical: in “the body and bow moving and working together”.

The book is split into two parts. The first part, Body and Bow Anatomy, covers the bones, muscles and movements of the human body in some depth and with a vast number of detailed illustrations. This first section also deconstructs bow anatomy, and demonstrates the forces that radiate through a bow in motion.

Part Two, Technique Analysis, explores the physical forces that bind archer and bow in the act of shooting. Anatomical diagrams show exactly what your bones, joints and muscles are doing throughout the shooting sequence. The push-and-pull of forces between the body and the bow, and the effect these forces have on the movement of the muscular-skeletal system, are clearly illustrated. If you want to know exactly why a twisted wrist gives a sloppy release (settle down at the back), Physics is here to tell you.

There’s an immense amount of detail here: every part of the body that comes into contact with the bow, at every stage of the shooting process, is deconstructed to the bone — almost literally. There’s an especially interesting look at variance in facial structures —noses and chins, anyway — and how these natural differences impact the efficacy of the reference point.

In terms of bow style, Archery Anatomy is focused very much on Olympic recurve — there’s no mention of traditional bow types here. Most of the information presented will apply equally to all tribes, but the author does assume that stabilizers and a sight are being used.

It is exceptionally well illustrated (although male anatomy is depicted as default throughout, with the female body visible only in chapters specifically focused on sex differences). Physics aficionados, or those who just remember their school physics better than me, might get more out of the visual side of this book: there are a lot of force diagrams here. In a former life Axford was an airline design engineer, and he certainly applies an engineer’s eye to the body/bow relationship.

In that sense, the book is more likely to be of interest to coaches, or archers looking to seriously advance in the sport, than to the hobby archer.

That said, there’s no shortage of books covering the history, culture and psychology of shooting. Archery Anatomy brings the body back to the centre of the sport. In his sign-off, Axford argues that many new archers devote more time to learning arbitrary rules of engagement — competition etiquette, handicaps and so forth — than on developing the kind of basic body sense that sets one up for a life in sport. With recent developments in science suggesting that we think with our bodies as much as with our brains, he may have a point.

Archery Anatomy by Ray Axford was first published in 1995, and has been reprinted seven times since then. Published by Souvenir Press, it’s available for £12.99 in the UK and $16.95 in the US.


Ask the Experts – Why do people put twists in their bowstring?

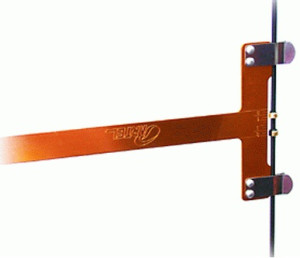
This is a great question and something that is often confusing for beginners. It’s all to do with something called ‘Brace Height’ which is the distance between the bow and the bowstring. You usually measure this from the button (hole in the riser near the arrow rest if there isn’t an actual button yet) to the string using a bow square. There will be a general guide for each individual riser – this is a starting point. From the starting point (usually around 8.5-9” for a 68” bow.. can be slightly less for a shorter bow and 9-9.5” for a 70”) you then need to do some basic tuning to determine what the perfect brace height for your bow is.


bow square


Couple of things :


1. You should always have the SAME brace height. If you lose ½” of brace height you might lose 20 points on a Portsmouth (or more). Remember that archery is “the art of repetition” and its all about reducing variation. Check your brace height at the start of every shoot.


2. Putting in twists will make the string effectively shorter (think about twisting up a piece of string) which will increase the brace height; taking twists out will effectively give you a longer string and therefore smaller brace height.


To do the tuning – start with the lowest sensible brace height and shoot 3 arrows. Take off string and put in a few twists (you’ll probably need to miss an end to do this). Re-measure brace height and shoot 3 arrows. Listen to the noise the string makes and note your grouping. If you have a bad end and you know you shot badly you might want to repeat another 3 arrows at the same brace height. Keep doing this until you have explored the full range (8”ish to 9.5”ish). You should find two ‘sweet spots’ where the bow sounds quietest and shoots the best – one will be at the lower end of the range and one will be at the higher end of the range. I’ve never been madly successful with hearing this.. but you can usually tell that the bow just feels better. Choose the higher brace height out of the two not the lower. Remember this or mark it down somewhere.


Store the string by doing a simple loop through loop knot (any experienced archer can quickly show you how to do this) in order not to lose twists and have to start from scratch the next time you shoot.


Here’s a little You Tube video I found showing this : http://youtu.be/em_BP1uz2Gw?t=32s


Quick tip : you know that the brace height is too low if the string hits your wrist. As longbows need a much lower brace height than recurves the string ALWAYS smashes into your wrist. This is why longbow archers wear much thicker arm guards and they tend to be worn much lower down the arm.


Nocked Longbow


P.S. its also a good idea to check the brace height on club bows. We try and check them as often as we can.. but the more club members take the responsibility the better they’ll shoot. Just ask an instructor where the nearest bow square is.

Books – not just good for target practice, you can read them too!

There have been some great books and online resourses written recently on learning archery. These can be a great tool to remind and reinforce the lessons you’ve already been taught during our beginners couse and you’ll learn a whole host new skills to help you become a great archer.
The following books are recommended for someone who has just started in archery hopefully after doing a progressive beginners course (see our courses page for current availability of our great weekend, 3 week ‘Fast Track’ or regular 5 week beginers courses in London Bridge). The best books at this level help you to develop a solid, consistent form without going into deeply technical variations on the standard elements of the shot sequence. All three of the following books provide a clear guide to building a good shot sequence and will help a novice archer achieve good consistent form.
Archery (Steps to Success): Kathleen Haywood (Author), Catherine Lewis (Author) 
 
This is a very good book for people looking for a structured way to become a solid archer. 
  • Thorough – it’s a very thorough book and doesn’t miss out anything that a novice archer needs to know.
  • Easy to follow – provides an easy to follow program of exercises and provides space to record how well you have done on each exercise. A fun and interesting way to learn.
  • Clear illustrations – good clear photos and drawings of each step to help you to conceptualise your body position.
  • Bow tuning – a great section on basic bow tuning so you can get your bow up to speed at the same time as you improve your form.
Other good beginner books to try are:
Archery Fundamentals: A Better Way to Learn the Basics by Douglas Engh (Author)
Less rigidly structured than Steps to success, so is good if you prefer to structure your own training/learning your way.
The Archery For Beginners Guidebook by Archery GB (only available through archery stores, e.g. Clickers, Aim 4 Sport, Merlin etc)
Has a very good guide on archery etiquette and protocols in competitions and in clubs. 
The Following online sources can also be helpful:
KSL International Archery 
This has a very good shot sequence. It’s brief in its description but is free to look at so worth a read. It does get pretty technical though. 
A very popular UK archery forum, this can be a useful recourse for answering specific questions. Although do bear in mind that as it’s a forum there is often lots of arguing that can be distracting and confusing. The loudest voice is also not necessarily the most accurate!
 
These are the ones that I particularly favour but there are many more useful resources out there. Do let us know if you have any other recommendations that you’ve found useful on your archery journey!
Roger – 2020 Archery Instructor

How to Improve Your Archery

We get a steady trickle of requests about additional coaching to help you progress once the beginners course is finished. Often these requests come very soon after completing the beginners course and there are a few things that we’d recommend you try first. 

We do offer advanced coaching either as a 1 to 1 or if you can gather together 4 people that want a weekly group coaching session for 4x weeks we can arrange it (but we don’t put together the groups ourselves). http://www.2020archery.co.uk/club-3/Private-Tuition


  • Secondly, buy some books and magazines! We like Fundamentals of Recurve Archery, Steps to Success (a bit American) and The Art of Repetition by Simon Needham. The Art of Repetition is particularly good for bow tuning if you’ve just bought some kit (and has a DVD available as well). The best magazine out there is called Bow International – they have lots of features on coaching and improving your shooting.


  • Make friends! If two of you can team up you can observe each other’s performance and give very worthwhile feedback, even if you’re a novice. You might not spot everything but you can check the basics of drawing position, release and stance. Even for more experienced archers just having someone step back and look at you (even better film a few arrows of each other shooting and watch them back together) can be hugely helpful.


  • Get out and about cont’d. Aim4Sport do some great continued coaching. It costs about £30 for a 1 hr one to one or you can book 6 sessions for £150. You’ll probably be able to get some outdoor experience as well if you can get up there (Bedfordshire) and get some longer distances under your belt. http://www.aim4sport.com/archery-lessons/coaching/


  • Join Archery Interchange UK (AIUK) – it’s a web forum for archers and you can make some friends, get some advice (obviously not all advice will be useful) and perhaps join in some competitions / leagues. The more archery you do and see the better you’ll get. Sometimes you just have to launch into the wider community and get a bit immersed. Archery is all about developing muscle memory and making the commitment to practice – you’ll progress much faster by using the above resources and shooting 3 times/week, than by spending the money on 1 to 1’s every week for 6 months. http://www.archeryinterchange.com/forum


  • If you’ve done all this and you’d still like one of our instructors to work with you we can arrange 4x 1hr sessions for £250. We know this is expensive but our costs are really high compared to other clubs and this isn’t really something that we specialise in (i.e. we aren’t set up like the shops where they have people who’s time needs to be filled – we have to organise and book everything individually and people – including administrators – need realistic payment for this). You can ask for a particular instructor and as long as they aren’t working we’ll try and get you hooked up. The 4 lessons must be taken within a 6 month period and can’t be carried over. Sorry but we can’t offer discounts, ‘half a course’ or sharing with a mate etc. It’s important to us that we can really deliver something useful for you and this seems to be the best way for us to do that. We can also arrange an intermediate course if you have a group of 4 people who can agree on 4 dates to book. Intermediate courses cost £100pp.  

Remember the thing that will help your shooting most of all is to practice! Practice a lot and I PROMISE you will improve!

Best of luck and Happy Shooting!!

Mark : From Novice to Competitor.

Alternate title – I am a contender!


Hello! I’m Mark and I’ve been shooting at 2020 Archery for the last two years. I first used a Recurve bow at a Have A Go stag event and enjoyed it so much that I went on to take a weekend course, joining the club shortly afterwards. After a few months of shooting I started to consider buying my own bow and set myself the goal of scoring 500 on a Portsmouth using a club bow, at which point I would shell out on the new kit. 

Exactly one year after my training weekend I was the proud owner of a Hoyt bow with XX75 arrows, which I bought from Asher at 2020 after testing out a few different bow setups. With the benefit of hindsight, I wish I’d bought my first bow sooner; the fastest way to improve in the beginning is to use the same kit week in, week out, and the only real way to have that sort of control is to own your bow and get to know it intimately.

I decided early in my second year of shooting that I wanted to shoot competitively. A few weeks ago I shot at my first tournament and caught the bug; a week later I was shooting at my second tournament and the third, fourth and fifth have been booked. 

The process of preparing for and then shooting at a tournament certainly bring your practice into focus.  This is the area my blog posts will focus on. I put off entering competitive shoots for some time because I had so many questions about how it all worked, what it was going to be like and how good the other competitors were going to be. I’d like to share my experiences with you, because it’s not as scary as it might seem and it’s loads of fun. Honest!

Roger : An Archers Path by Roger Huggins

Hi, my name is Roger and I’ve been shooting all sorts of bows for about 6 years. I’ve been teaching modern recurve archery at 2020 Archery for the past 8 months during which time I have taught over 200 people and counting. I learnt to shoot while I was at university in Sheffield with a recurve training bow. I was fortunate enough to be able to shoot compound bows and modern recuves after which I bought myself a very nice long bow which I still shoot today. I have a love of historical archery and own – or have owned – a long bow, a horse bow and a Chinese repeating crossbow.
 
Last year I came back to modern recurve archery when I started using them to teach beginners. To refresh and expand my knowledge I read several books on archery and coaching (more of this later) and I also started practicing with the recurve several times a week. After a few months of practicing and improving my form with a training bow I started building my dream recurve. Components started trickling in during September 2012 with the aim of having everything together ready for me to start shooting in competitions early in 2013.
 
Which neatly brings me to the aim of this blog, over the next few months I am going to share my experiences of my journey along the path from being a seasoned traditional archer, through intermediate archer, to (hopefully) competitive modern recurve archer.

Hopefully this will be interesting.. and hopefully it will also help beginner and intermediate archers avoid some of the pitfalls and problems that I’m encountering myself. I’m also working with a few people at the club trying to sort various issues which I’ll be able to share with you. I’ll be offering suggestions on how to move forward with your archery if you find yourself getting stuck in a rut, whether its getting over a slump or just looking to get something more from archery than shooting a few ends in your club once a week (not that there’s anything wrong with shooting a few ends once a week!). 
 
Well that’s more than enough about me, my next post will be on improving your knowledge to improve your shooting, what books to read and when and how to get the most out of watching the professionals.